The following pictures and diagrams are used to illustrate just how to execute the various plays given. The pictures show the formations and the exact positions each individual should assume. By consulting this the player can tell just where to line up in his proper place; the men are lettered so each player can tell just where he should be. The diagrams following each illustration show how to execute the different plays from that same formation. The positions of the men in the diagrams are lettered just like the men lined up in the formation. The plays given are for one side of the line only--they can all be worked on the opposite side just as well. The diagrams show just where each man should go in each play, and the reading under the diagram tells him just what he should do. An explanation of the diagram is as follows:


Regular Formation--Full Back Plunge Through Center.
This is the quick mass play on right of center.
Center blocks opposing center to left.
Left Guard helps throw opposing center to left.
Right Guard blocks opposing guard out to right.
Left Tackle breaks through and cuts off opposing half back and assists runner.
Right Tackle assists in throwing opposing left guard out.
Left End comes around quickiy and pushes from behind.
Right End blocks opposing tackle out and goes through and assists the runner.
Quarter Back passes ball to full back, then helps hold him up and carry him forward.
Left Half Back assists runner on the left hip.
Right Half Back assists runner on right hip.
Full Back takes ball and goes in low and hard to keep feet as long as possible.

Regular Formation - Right Half Back Straight Ahead Through Right Tackle.
This is a quick opening play and should strike almost at the position occupied by offensive right tackle.
Center blocks his man to the left.
Left Guard assists in throwing opposing center to the left.
Right Guard blocks opposing left guard to the left.
Left Tackle breaks through behind opposing line, cuts off full back and assists runner.
Right Tackle assists in blocking opposing left guard to the left.
Left End comes around and assists runner from behind.
Right End blocks opposing tackle out.
Quarter Back helps hold the runner up and carries him forward.
Left Half Back assists the runner on the left hip.
Right Half Back receives the ball from the quarter by a toss and plunges low into the line.
Full Back assists the runner on right hip.

Regular Formation - Full Back Mass on Right Tackle.
This play is in the nature of a revolving mass on tackle.
Center blocks opponent to left.
Left Guard goes through, cuts off reinforcements and assists the runner.
Right Guard blocks opponent to left.
Left Tackle comes around quickiy and assists the full back on the left hip.
Right Tackle assists in blocking opposing guard to left.
Left End follows around and pushes from the rear.
Right End blocks opposing tackle out.
Quarter Back helps carry the runner from the inside.
Left Half Back assists the runner on the right hip.
Right Half Back goes ahead of the runner and assists the right end in blocking the right tackle out.
Full Back carries the ball.

Regular Formation - Left Half Back Cross Buck Outside of Right Tackle.
This is in the nature of a quick driving play directly over the position occupied by the defensive right end.
Center blocks opponent to left.
Left Guard goes through, cuts off reinforcements and assists the runner.
Right Guard blocks the opponent to left.
Left Tackle comes around and assists the runner by his interference.
Right Tackle blocks opposing guard and assists in checking opposing tackle.
Left End comes around quickly, watching for a fumble and carries runner forward when tackled.
Right End boxes opposing tackle.
Quarter Back passes ball to left half on the run, keeping ahead of him for interference.
Left Half Back is the runner.
Right Half Back goes forward quickly and blocks opposing back in toward tackle.
Full Back blocks opposing end out.

Regular Formation - Left Tackle Around Through Right Tackle.
This play should not be attempted on a wet field.
Center blocks opponent to left.
Left Guard goes through, cuts off reinforcements.
Right Guard blocks opponent to left.
Left Tackle leaves position quickly, swings close around quarter, who hands him the ball, and strikes the opening between tackle and his own right end.
Right Tackle blocks opposing guard in.
Left End follows and assists the tackle from the rear.
Right End blocks opposing tackle out.
Quarter Back assists the runner on the left side, keeping him on his feet and carrying him forward.
Left Half Back pushes from behind.
Right Half Back goes ahead of the runner and assists right end in blocking opposing tackle.
Full Back assists the runner on right hip.

Regular Formation - Quarter Back Kick.
This play should not be used when the ball is likely to be kicked out of bounds or when opposing ends are playing very wide.
Center blocks opponent to left.
Left Guard goes through imnmediately and blocks any of the opposing backs possible.
Right Guard blocks opponent to left.
Left Tackle goes through and cuts off reinforcements.
Right Tackle protects kicker and blocks to the left.
Left End comes around rapidly to secure ball if blocked or to tackle runner if opponent secures the ball.
Right End blocks opposing tackle or half back.
Quarter Back, after kicking ball, should secure it if possible or assist any of his own men who do.
Left Half Back and Full Back should stay on side until kick is made and the one in the best position should secure it, the other one interfering.
Right Half Back should go directly forward and block any opponent who attempts to get the ball.


Tackle Back Formation - Tackle Straight Ahead.
This is a quick, line-driving play.
Center blocks opponent to left.
Left Guard breaks through and cuts off reinforcements.
Right Guard blocks opponent to left.
Left Tackle carries the ball, going low and hard.
Right Tackle blocks opposing guard in.
Left End comes around and assists the runner on left hip.
Right End blocks opposing tackle out.
Quarter Back assists the tackle by carrying him forward and holding him up.
Left Half Back pushes from the rear.
Right Half Back assists in blocking opposing tackle out.
Full Back assists the runner on the right hip.

Tackle Back Formation - Left Half Back Cross-Bucks Outside Right End.
This play should be a quick running play.
Center blocks opponent to left.
Left Guard goes through, cuts off reinforcements and joins the runner.
Right Guard blocks opponent to left.
Left Tackle follows right half in the interference, blocking to the left.
Right Tackle blocks opposing guard in.
Left End follows runner and assists him in any way possible.
Right End boxes opposing tackle.
Quarter Back passes ball to the runner on the run and follows left tackle in the interference.
Left Half Back is the runner.
Right Half Back assists in blocking opposing tackle, if necessary; if not, takes opposing half.
Full Back blocks opposing end out.

Tackle Back Formation - Full Back Mass on Tackle.
This is in the nature of a revolving mass play.
Center blocks the opponent to the left.
Left Guard goes through and assists the runner.
Right Guard blocks to the left.
Left Tackle blocks opposing end out.
Right Tackle blocks opposing guard to left.
Left End follows and assists from behind.
Right End blocks opposing tackle.
Quarter Back assists in carrying the runner forward.
Left Half Back assists the runner on the right hip.
Right Half Back blocks opposing tackle or half back, whichever is needed.
Full Back carries the ball.

Tackle Back Formation - Full Back Buck Over Left Guard.
This play is to be used if opposing linemen are shifting to the right.
Center blocks to the right.
Left Guard blocks opposing guard to the right.
Right Guard blocks opposing guard out.
Left Tackle assists runner on left hip.
Right Tackle breaks through, cuts off reinforcements, and and assists the runner.
Left End blocks opposing tackle out.
Right End follows around and pushes the runner.
Quarter Back assists the runner by holding him up and carrying him forward.
Left Half Back assists left end in blocking opposing tackle out.
Right Half Back pushes in the rear.
Full Back carries the ball over the left guard position.

Tackle Back Formation - Tackle Cross-Buck.
This play is effective especially when opponents are shifting to meet this formation.
Center blocks opponent to the right.
Left Guard blocks opponent to the right.
Right Guard blocks opponent to the right.
Left Tackle carries the ball over position occupied by left guard.
Right Tackle breaks through, cuts off the reinforcements and assists the runner.
Left End blocks opposing tackle out.
Right End follows runner and assists from the rear.
Quarter Back assists the runner by holding him up and helping him forward.
Left Half Back assists left end in blocking opposing tackle out.
Right Half Back assists the runner on left hip.
Full Back goes through opening ahead of runner clearing the way.
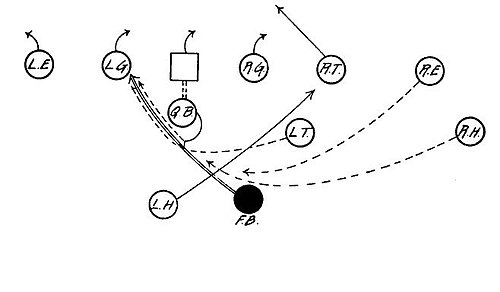
Tackle Back Formation - Fake Attack - Full Back Buck on Left Side.
This is a fake interference play, left half going across as if to attack the right side.
Center blocks opponent to the right.
Left Guard blocks opponent to the right.
Right Guard blocks opponent to the right.
Left Tackle assists the runner on the left hip.
Right Tackle breaks through, blocks off reinforcements.
Left End blocks opposing tackle out.
Right End comes around and assists the runner from behind.
Quarter Back turns as if to pass the ball to the left half back and then turns on around and passes to full back for a plunge through left guard. He should assist the runner by carrying him forward.
Left Half Back runs off right tackle with all appearances of having the ball.
Right Half Back comes around and pushes from the rear.
Full Back carries the ball. He should hesitate an instant before starting.
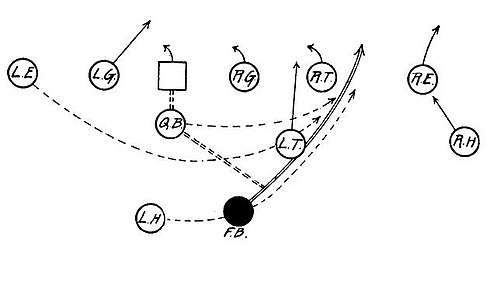
Tackle Back Formation - Full Back Plunge Through Right Tackle.
This play should not follow in the direction the left tackle charges, but should appear to do so at the start and then swerve off to the right.
Center blocks opponent to the left.
Left Guard goes through, cuts off opposing half back and assists the runner.
Right Guard blocks to the left.
Left Tackle charges forward low between right guard and right tackle, blocking opposing guard.
Right Tackle blocks opposing defensive back.
Left End runs around and assists from the rear.
Right End blocks opposing tackle out.
Quarter Back assists the runner by holding him up.
Left Half Back assists the runner on the right hip.
Right Half Back assists in blocking opposing tackle out.
Full Back takes the ball.
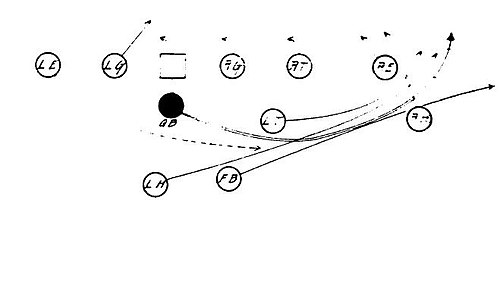
Tackle Back Formation - Quarter Back Run.
This play should be attempted if opposing ends are playing in close and the quarter back is good at carrying the ball.
Center blocks opponent to the left.
Left Guard goes through, blocks opposing back and joins the runner if possible.
Right Guard blocks opponent to left.
Left Tackle follows the right half in the interference and blocks the first man he meets.
Right Tackle blocks opposing guard in.
Left End follows the runner and renders him any assistance possible.
Right End blocks opposing tackle.
Quarter Back is the runner with the ball.
Left Half Back follows left tackle in the interference.
Right Half Back blocks opposing tackle if necessary; if not, takes opposing half.
Full Back blocks opposing end out or in, whichever is best.

Tackle Back Formation - Right Half Back Run Around Left End.
This play should be made very quickly. The right half back must be speedy and get away quickly.
Center blocks opponent to the right.
Left Guard blocks opponent to the right.
Right Guard goes through.
Left Tackle protects runner from inside.
Right Tackle goes through and cuts off opponents' half back.
Left End boxes opposing tackle.
Right End comes around and assists from behind.
Quarter Back passes ball to half back and goes ahead for interference.
Left Half Back plunges forward into line as if the attack were at center.
Right Half Back is the runner.
Full Back blocks opposing end.


Tackle Over Formation - Right Half Back Straight Ahead.
This play should be able to make ground between two strong tackles.
Center blocks opponent to left.
Left Guard breaks through and blocks off any of opponents' back-field men.
Right Guard blocks opponent to left.
Left Tackle blocks opposing tackle out.
Right Tackle blocks opposing guard to left.
Left End follows around and joins in the push.
Right End assists in blocking tackle out.
Quarter Back helps carry half forward.
Left Half Back assists runner on left hip.
Right Half Back takes ball and goes in low and hard.
Full Back assists runner on outside hip.

Tackle Over Formation - Tackle Over Formation - Left Half Back Run Around Right End.
This play must get away quickly and go fast.
Center blocks to left.
Left Guard breaks through and blocks off half back - joins runner if possible.
Right Guard blocks to left.
Left Tackle blocks to left.
Right Tackle blocks to left.
Left End follows and assists in any way possible.
Right End boxes opposing tackle.
Quarter Back passes ball to left half on the run and goes ahead in the interference.
Left Half Back is the runner.
Right Half Back blocks opposing back.
Full Back blocks opposing end.

Tackle Over Formation - Full Back Mass on Tackle.
This is a quick-moving mass play. All must get in and help.
Center blocks to left.
Left Guard breaks through and cuts off reinforcements.
Right Guard blocks to left.
Left Tackle blocks to left.
Right Tackle blocks to left.
Left End comes around and pushes from behind.
Right End blocks tackle out.
Quarter Back helps runner along from the left side.
Left Half Back assists runner on right hip.
Right Half Back goes ahead and clears the way.
Full Back is the man with the ball.

Tackle Over Formation - Full Back Cross-Buck Over Left Guard.
This play should be executed quickly when started.
Center blocks to right.
Left Guard blocks to right.
Right Guard blocks to right.
Left Tackle goes through.
Right Tackle goes through and assists runner.
Left End blocks opposing tackle out.
Right End follows around fast.
Quarter Back carries full back forward.
Left Half Back assists left end to block tackle out.
Right Half Back pushes full back from behind.
Full Back carries the ball over left guard position.

Tackle Over Formation - Right Half Back Cross-Buck.
Play to be used if opponents are shifting.
Center blocks to right.
Left Guard blocks to right.
Right Guard blocks to right.
Left Tackle follows and protects runner from inside.
Right Tackle breaks through and cuts off reinforcements.
Left End boxes opposing tackle.
Right End follows and assists runner.
Left Half Back blocks opposing half.
Right Half Back is the man with the ball.
Full Back takes opposing end.

Tackle Over Formation - Left End Around.
Play should not be used on a slippery field.
Center blocks to left.
Left Guard breaks through and joins runner.
Right Guard blocks to left.
Left Tackle blocks to left.
Right Tackle blocks to left.
Left End gets away quickly and takes the ball by a toss from the quarter back.
Right End blocks opposing tackle.
Quarter Back passes ball and goes ahead and interferes for runner.
Left Half Back follows right half in interference.
Right Half Back blocks opposing half back.
Full Back blocks opposing end.

Tackle Over Formation - Quarter Back Run.
A good play to use if the opponents are playing close on defense. It will open them up or the play will make ground.
Center blocks to left.
Left Guard breaks through and cuts off reinforcements.
Right Guard blocks to left.
Left Tackle blocks to left.
Right Tackle blocks to left.
Left End follows and aids in any way he can.
Right End blocks opposing tackle.
Quarter Back is the runner.
Left Half Back blocks opposing end.
Right Half Back blocks opposing tackle or half.
Full Back follows right half back in the interference.


Tandem - Tackle Over - Left Half Back Cross-Buck.
This play must be executed rapidly.
Center blocks to left.
Left Guard breaks through, blocks half back.
Right Guard blocks to left.
Left Tackle blocks to left.
Right Tackle blocks to left.
Left End follows and assists.
Right End boxes opposing tackle.
Quarter Back passes ball quickly and gets into the interference.
Left Half Back is the runner.
Right Half Back blocks opposing half back.
Full Back blocks opposing end.

Tandem - Tackle Over - Full Back Buck.
This play should be executed with a dive, instead of a slow mass play.
Center blocks to left.
Right Guard breaks through and blocks opposing backs to left.
Left Guard blocks to left.
Left Tackle blocks to right.
Right Tackle blocks to left.
Left End follows around and pushes.
Right End blocks opposing tackle out.
Quarter Back helps the runner.
Left Half Back assists the runner on right hip.
Right Half Back goes ahead of runner.
Full Back takes the ball.


Tandem - Tackle Over - Full Back Buck.
Can be used if opponents shift.
Center blocks to right.
Left Guard blocks to right.
Right Guard blocks to right.
Left Tackle breaks through.
Right Tackle breaks through, blocks off backs.
Left End blocks tackle out.
Right End follows around.
Quarter Back helps the runner.
Left Half Back assists left end in blocking tackle out.
Right Half Back follows runner through.
Full Back takes the ball through left guard.

Tandem - Tackle Over - Right Half Back Cross-Bucks.
This is a close, driving, mass play on center.
Center charges ahead and to the right.
Left Guard blocks to left.
Right Guard blocks to right.
Left Tackle breaks through.
Right Tackle blocks to right.
Left End blocks opposing tackle out.
Right End follows.
Quarter Back carries runner forward.
Right Half Back is the runner.
Left Half Back and Full Back push from behind.


Tandem - Tackle Over - Left End Around.
Center blocks to left.
Left Guard blocks to left, goes through.
Right Guard blocks to left.
Left Tackle blocks to left.
Right Tackle blocks to left.
Left End comes around rapidly and takes the ball.
Right End boxes opposing tackle.
Quarter Back passes ball to end and then makes interference.
Left Half Back, Right Half Back and Full Back all go ahead for interference.

Tandem - Tackle Over - Quarter Back Run.
This play to be successful must be executed rapidly. All the interference must "hurry up."
Center blocks to left.
Left Guard breaks through, joins runner.
Right Guard blocks to left.
Left Tackle blocks to left.
Right Tackle blocks to left.
Left End follows around.
Right End boxes tackle.
Quarter Back is the runner.
Left Half Back blocks opposing end.
Right Half Back blocks opposing half.
Full Back follows right half back in the interference.

Tackle Straight Back - Left Tackle Straight Plunge.
In this play the tackle bucks straight ahead over the position occupied by left guard.
Center blocks to right.
Left Guard blocks to right.
Right Guard blocks to right.
Left Tackle is the man to take the ball.
Right Tackle blocks opposing backs to right and assists runner.
Left End blocks tackle out.
Right End comes around and pushes from behind.
Quarter Back carries the tackle forward.
Left Half Back breaks through and assists.
Right Half Back assists runner on right hip.
Full Back assists runner on left hip.

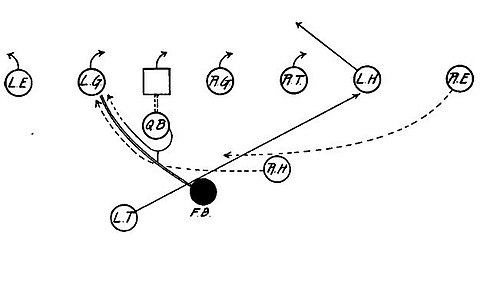
Tackle Straight Back - Full Back Cross-Buck.
This is a feint attack by left tackle on the right side of the line, and the full back makes the real attack at left guard position.
Center blocks to right.
Left Guard blocks to right.
Right Guard blocks to right.
Left Tackle starts as if to carry ball to right.
Right Tackle blocks to right.
Left End blocks opposing tackle out.
Right End follows and assists from behind.
Quarter Back turns as if to pass ball to left tackle and turns on around and passes ball to full back and then assists runner.
Left Half Back breaks through and assists.
Right Half Back assists runner on left hip.
Full Back is the runner.

Tackle Straight Back - Right Half Back Cross-Buck.
This play is more in the nature of a run than a plunge and must be pulled off fast.
Center blocks to right.
Left Guard blocks to right.
Right Guard blocks to right.
Left Tackle goes straight into the line and appears to take the ball.
Right Tackle blocks to right.
Left End boxes tackle.
Right End follows and assists runner.
Quarter Back makes a bluff at passing ball to left tackle and then passes it to right half, then goes ahead in the interference.
Left Half Back breaks through and joins runner.
Right Half Back takes the ball.
Full Back blocks opposing end.


Tackle Back Square - Left Tackle Plunge Through Center.
This is a close mass play. Execute slowly; all hold together.
Center charges his man straight back and to the right.
Left Guard blocks to the left.
Right Guard blocks to right.
Left Tackle takes the ball.
Right Tackle blocks opponent to right.
Left End goes through and assists runner.
Right End hurries around and joins in the push.
Quarter Back assists runner by holding him up and helping him forward.
Left Half Back assists on left hip.
Right Half Back blocks to the left.
Full Back assists on right hip.

Tackle Back Square - Left Half Back Run Around Tackle.
This play should go off quickly.
Center blocks to left.
Left Guard goes through, joins runner.
Right Guard blocks to left.
Left Tackle leads interference.
Right Tackle blocks opponent to left.
Left End follows.
Right End boxes opposing tackle.
Quarter Back assists runner from inside.
Left Half Back takes the ball.
Right Half Back comes around for interference.
Full Back blocks opposing end.

Tackle Back Square - Tackle Straight Plunge.
This is a slow mass play on or just inside opposing tackle.
Center blocks to left.
Left Guard goes through and blocks to left.
Right Guard blocks to left.
Left Tackle takes the ball.
Right Tackle blocks to left.
Left End follows around and joins in the push.
Right End blocks tackle out.
Quarter Back assists in helping runner ahead.
Left Half Back assists runner on left hip.
Right Half Back goes through.
Full Back assists runner on left hip.

Tackle Back Square - Full Back Plunge.
The full back should follow the path of the left tackle.
Center blocks to left.
Left Guard goes through to assist.
Right Guard blocks to left.
Left Tackle leads the interference through the line.
Right Tackle blocks to left.
Left End comes around and joins in the push.
Right End blocks tackle out.
Quarter Back assists the runner to keep his feet and go ahead.
Left Half Back assists on right hip of runner.
Right Half Back goes through and across to assist.
Full Back carries the ball.

Tackle Back Square - Full Back Cross-Buck.
This is a feint to hit the right side of the line, but full back cross-bucks over left guard.
Center blocks to right.
Left Guard blocks to right.
Right Guard blocks to right.
Left Tackle goes ahead and appears to take ball for plunge through the guard-tackle hole.
Right Tackle goes through and assists.
Left End assists, blocking tackle out.
Right End comes around and pushes.
Left Half Back goes through ahead of runner.
Right Half Back blocks tackle out.
Full Back takes the ball.

Tackle Back Square - Left End Around.
This play must get away rapidly and keep going. It should not be attempted on a wet field.
Center blocks to left.
Left Guard goes through.
Right Guard blocks to left.
Left Tackle leads the interference.
Right Tackle blocks to left.
Left End must hurry.
Right End boxes tackle.
Quarter Back passes ball and goes ahead in the interference.
Left Half Back blocks opposing end.
Right Half Back goes through and joins runner.
Full Back follows left tackle in the interference.

Tackle Back Square - Quarter Back Run.
Like all plays that strike wide from the center, this play must be executed rapidly.
Center blocks to left.
Left Guard goes through and joins runner.
Right Guard blocks to left.
Left Tackle heads the interference.
Right Tackle blocks to left.
Left End follows and protects runner.
Right End boxes opposing tackle.
Quarter Back must go fast.
Left Half Back blocks opposing end.
Right Half Back aids the runner by coming around for interference.
Full Back follows the left tackle in the interference.

Tackle Back Square - Delayed Pass.
The success of this play will depend largely on the concealment of the ball by the quarter back and the way the right end carries out his part.
Center blocks to left.
Left Guard blocks to left.
Right Guard blocks to left.
Left Tackle leads the feint attack around the left.
Right Tackle blocks to left.
Left End goes through and blocks defensive full back.
Right End comes around and appears to take the ball from quarter back for run around left end.
Quarter Back makes a bluff at passing ball to right end, holds it concealed a moment and then passes to left half back.
Left Half Back waits for ball and then goes through right side.
Right Half Back blocks to left.
Full Back interferes for right half back.


Tackle Straight Back Formation - Left Tackle Cross-Buck.
This play strikes on the strong side. The men should take their positions in the formation as they line up; not go to the regular formation and then shift. Should be played quickly after the men are in position.
Center blocks to the left.
Left Guard breaks through and assists runner.
Right Guard blocks to the left.
Left Tackle takes the ball.
Right Tackle blocks to the left.
Left End follows and assists from behind.
Right End blocks opposing tackle out.
Quarter Back carries the runner forward from the inside.
Left Half Back follows the runner and pushes from behind.
Right Half Back assists right end in blocking opposing tackle out.
Full Back assists runner on right hip.

Tackle Straight Back Formation - Delayed Pass.
The success of this play will depend largely on the deception used by the right end and the quarter back.
Center blocks to the left.
Left Guard blocks to the left and breaks through.
Right Guard blocks to the left.
Left Tackle follows left half back in a feint on the left side.
Right Tackle blocks to the left.
Left End goes through to block opposing full back.
Right End comes around quickly and makes a bluff at taking the ball, and continues on as if he had it.
Quarter Back appears to pass the ball to right end, conceals it for a moment and then passes it to right half back, getting into the interference for the right half back if possible.
Left Half Back blocks opposing half back.
Right Half Back hesitates until quarter is ready to pass him the ball and then takes the ball and goes through the right side.
Full Back follows left half back and left tackle in the feint attack on left side.

Tackle Straight Back Formation - Quarter Back Run.
This play should meet with success if the opponents are shifting to meet the tackle-back formations and the play is executed rapidly.
Center blocks to the left.
Left Guard goes through, blocks opposing half back and joins the runner.
Right Guard blocks to the left.
Left Tackle follows the right half back around in the interference.
Right Tackle blocks to the left.
Left End goes follows the runner.
Right End blocks opposing tackle.
Quarter Back is the runner on a direct pass.
Left Half Back blocks off anyone attempting to follow.
Right Half Back leads the interference and blocks defensive back.
Full Back blocks opposing end.


Direct Pass Formation - Right Half Back Run Around Left End.
In this play the half back takes the ball on a direct pass from center. To make it effective all the interference must get away quickly and move rapidly. This should be a much stronger play than the direct pass run by the quarter back.
Center should be careful in his pass to right half, as the distance is a little longer than his usual pass. He should pass it ahead of the half back so that he can receive it on the run.
Left Guard blocks to the right.
Right Guard breaks through and joins the runner.
Left Tackle blocks to the right.
Right Tackle follows left half back in the interference.
Left End boxes opposing tackle.
Right End follows around behind the runner.
Quarter Back follows right tackle in the interference.
Left Half Back blocks opposing defensive back.
Right Half Back is the runner.
Full Back blocks opposing end.

Direct Pass Formation - Double Pass - Right Tackle to Full Back.
This play to be used when opponents are shifting to stop the preceding play.
Center blocks to the left.
Left Guard breaks through.
Right Guard blocks to the left.
Left Tackle breaks through and joins the runner.
Right Tackle follows right half in the interference around right end.
Left End follows in the interference.
Right End boxes opposing tackle.
Quarter Back blocks opposing end.
Left Half Back assists the runner from the left side.
Right Half Back leads the interference and blocks the opposing half back.
Full Back is the runner.

Direct Pass Formation - Double Pass - Right Half Back to Full Back.
This is in the nature of a feint attack on left end for a full back plunge through the line.
Center must be careful in making pass to right half back.
Left Guard blocks to the right.
Right Guard blocks to the right.
Left Tackle blocks to the left.
Right Tackle goes straight ahead and makes a hole for the runner.
Left End assists in blocking opposing tackle out.
Right End follows around and joins in the push.
Quarter Back leads a feint attack on left end.
Left Half Back, who has taken a position slightly behind his original position, hesitates a moment and then goes through on the left hip of the full back.
Right Half Back receives the ball from center on the run and passes it to the full back and follows the quarter back on around left end.
Full Back hesitates until he receives the ball and plunges through the line in the path of the right tackle.


Wing Shift Formation - Direct Pass to Left Half Back.
Practically the entire team is shifted and the success of this play will depend almost entirely on lining up quickly and starting the play immediately. Do not give opponents time to take in the situation thoroughly.
Center must be careful in his pass, as it is a long, quick one.
Left Guard follows for safety man.
Right Guard blocks to the left.
Left Tackle blocks to the left.
Right Tackle blocks to the left.
Left End blocks to the left.
Right End blocks to the left.
Quarter Back follows right half back in the interference around right end.
Left Half Back takes the ball on a direct pass from center and follows quarter back.
Full Back blocks opposing right end.
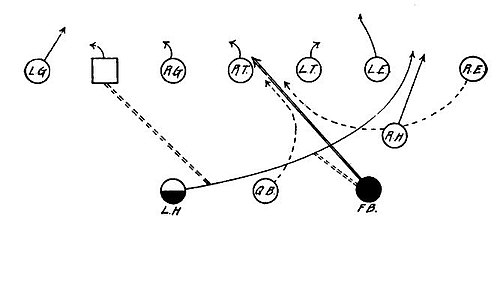
Wing Shift Formation - Double Pass - Left Half Back to Full Back.
This is a feint attack on right end with a full back plunge diagonally forward between the two tackles.
Center must watch out to make pass properly.
Left Guard goes through and blocks to the left.
Right Guard blocks to the left.
Left Tackle blocks to the right.
Right Tackle blocks to the left.
Left End assists right tackle in blocking to the right.
Right End comes around and assists the runner.
Quarter Back hesitates a moment, then assists the runner on the left hip.
Left Half Back receives the ball and passes it on the run to the full back.
Right Half Back makes a feint around right end, blocking anyone he can to the right.
Full Back after receiving the ball plunges between right and left tackle.

Wing Shift Formation - Double Pass - Left Half Back to Quarter Back.
The quarter back and right half back can change places, making the same formation exactly, so that the half back will be the one to plunge with the ball.
Center must pass the ball accurately.
Left Guard goes through and blocks to the left.
Right Guard blocks to the left.
Left Tackle blocks to the right.
Right Tackle blocks to the left.
Left End blocks to the right.
Right End hurries around and assists the runner.
Quarter Back, who has changed positions with the right half back, goes directly forward and blocks to the right.
Left Half Back receives the ball and passes it to the right half back and follows quarter back through right end, carrying out the feint attack.
Right Half Back when he receives the ball goes straight ahead between left and right tackle.
Full Back pushes the runner through from behind.


Fake Kick - Full Back Run.
The success of this play will depend largely in deceiving opponents into believing it is a real kick. All the men in the interference must do their duty.
Center in making the pass should make it so that the full back will get it on the run. This will help the play along very much.
Left Guard blocks to the left.
Right Guard blocks to the left.
Left Tackle blocks to the left and goes through to block opposing full back.
Right Tackle blocks to the left.
Left End goes ahead and blocks any of the opposing backs he can.
Right End blocks opposing end.
Quarter Back gets into the interference for the full back.
Left Half Back leads the interference for the full back.
Right Half Back blocks opposing defensive back.
Full Back is the runner.
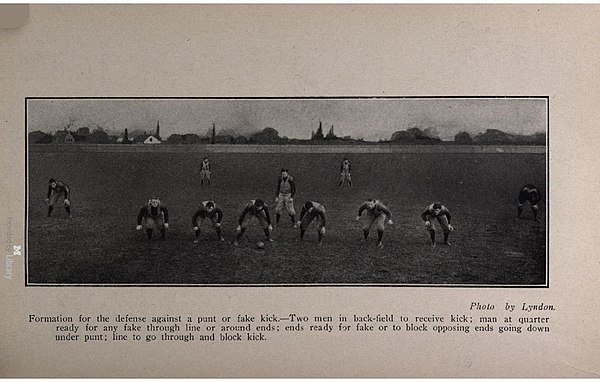

Fake Kick - Left Half Back Straight Through.
This play can be used with effect when the opposing line is playing wide so as to get through to block the kick or to stop a big kick around end.
Center passes to quarter and then blocks to the left.
Left Guard blocks to the left.
Right Guard blocks to the left.
Left Tackle goes through, blocks defensive quarter back.
Right Tackle blocks to the right.
Left End goes across and joins the runner.
Right End blocks opposing end.
Quarter Back receives the ball from center on the run and passes it to the left half back.
Left Half Back hesitates a second, receives the ball and then goes directly ahead.
Right Half Back assists right tackle in blocking out.
Full Back follows from behind.
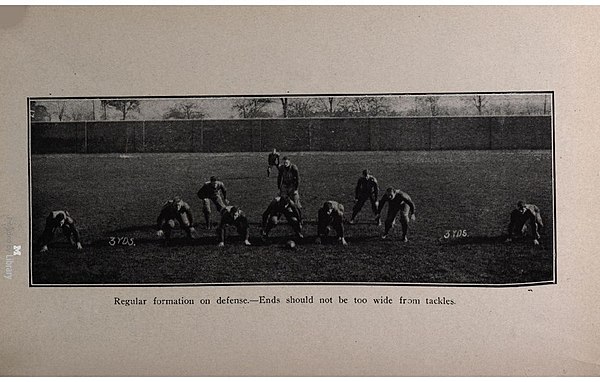

Defensive Formation - Regular.
The two ends should play close to the tackle, about three yards out; should charge ahead instantly with the snap of the ball, turning in quickly if play is directed at the line, but keeping well outside of all opponents' interference.
The two tackles must play wide enough so that they cannot be easily boxed by the opposing ends, yet not so wide that they can be easily thrown out. Use hands freely. Remember the end is the dangerous man.
The center should play a little higher and freer than either of the guards and he must be in position to do tackling on either side of center, or in fact along the entire line.
The three defensive backs must tackle everywhere. Wherever the runner is, there they must be.
The defensive quarter back should judge his distance behind the line by the direction of the wind and the strength of the opposing kicker. He must never be drawn in too close.


Defensive Formation - Line and Back-Field Shift.
This formation is used to meet the various tackle-back plays and tackle over on the line plays. The halftone illustration on the opposite page shows the position the men should assume just before the opponents snap the ball. In the diagram above the opposing center is shown, so that the relative position of the defensive linemen is shown as compared with the offensive linemen; the entire line on defense is shifted a half a man to the right. The right half back has gone up on the line with the right tackle. The defensive quarter back, which is being played by the full back, and the left half back have shifted their positions to the right. This would be the position taken by the team if the opposing side were using right tackle back or right tackle over on the line. The men would shift to just the opposite position should the opposing attack demand it.


Defensive Formation - Ends In.
This diagram shows what is commonly known as the Pennsylvania defense. The ends are played in very close to tackle and sent immediately into the opposing interference to break it up or tackle the runner. They will meet the interference before it is under much headway and will often be successful in spoiling the play behind the line. If the ends do not get the runner he will usually be left without interference and can be easily tackled by one of the defensive backs.
The two tackles play wide, but are driven in toward the center by a shove from the defensive backs.
The men are supposed to play along the lines as shown in the diagram. The halftone illustration on the opposite page shows the position the men should assume just before the ball is put in play by the opponents.